WooCommerce 2Checkout Inline Checkout 1.1.10 Extension
WooCommerce 2Checkout Inline Checkout 1.1.10 Extension
Download
http://getlot.co/shop/woocommerce-2checkout-inline-checkout-extension/
Get it now


Get it now
http://getlot.co/shop/woocommerce-2checkout-inline-checkout-extension/
Download
http://getlot.co/shop/woocommerce-2checkout-inline-checkout-extension/
Get it now
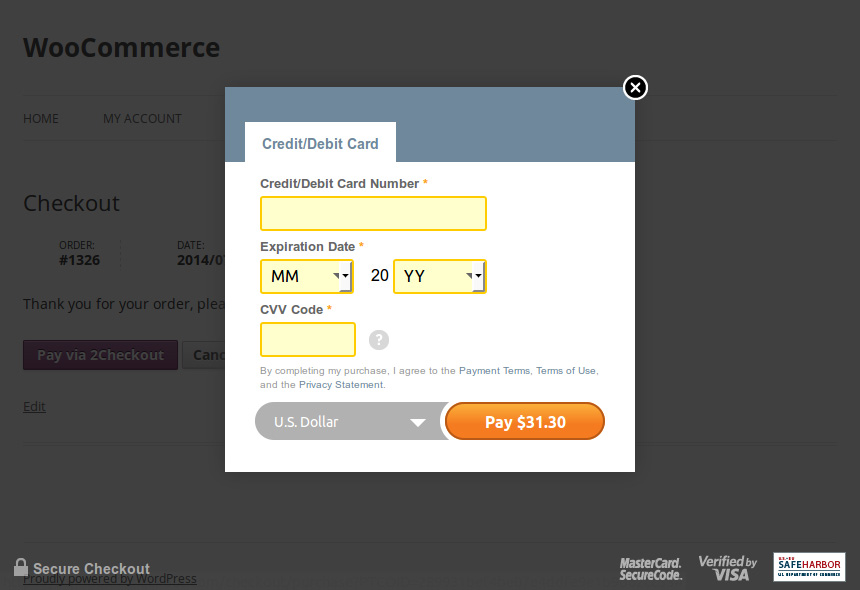
Checkout with 2Checkout without leaving your store
Certified by 2Checkout, Inline Checkout creates an iframe checkout option which displays a secure payment form inside your WooCommerce store. You are able to receive transactions from 196 countries through 87 currencies and 15 languages.
2Checkout Inline Checkout
2Checkout Inline Checkout creates an iframe checkout option that displays a secure payment form inside your WooCommerce store and allows you to process transactions from 196 countries using 26 currencies and 15 languages.
Installation
- Purchase the plugin at WooCommerce.com.
- Install and Activate the Plugin/Extension.
Setup and Configuration
2Checkout Setup
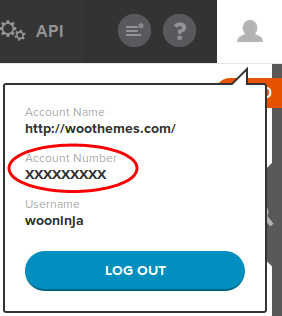
You must have a 2Checkout account to get an Account Number and set the return URL and notification URL. Go to 2Checkout and log in.
In the 2Checkout Seller Area, find your Account Number at the top right of the screen by clicking the profile icon:
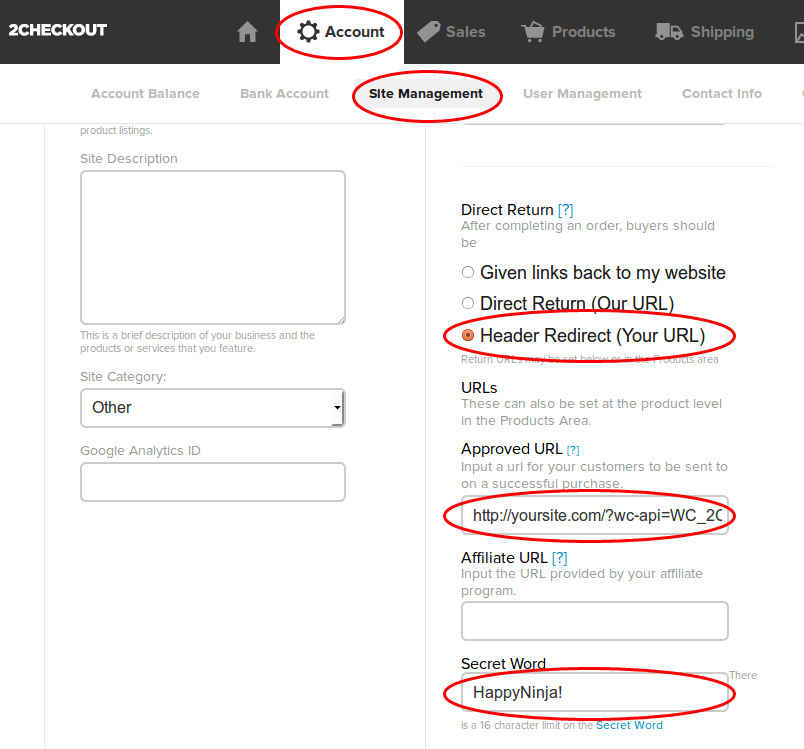
- Go to Account > Site Management.
- Set the Direct Return as Header Redirect (Your URL).
- Enter the Approved URL. For example:
http://yoursite.com/?wc-api=WC_2Checkout_Inline_Checkout_Gateway - Enter a strong Secret Word.
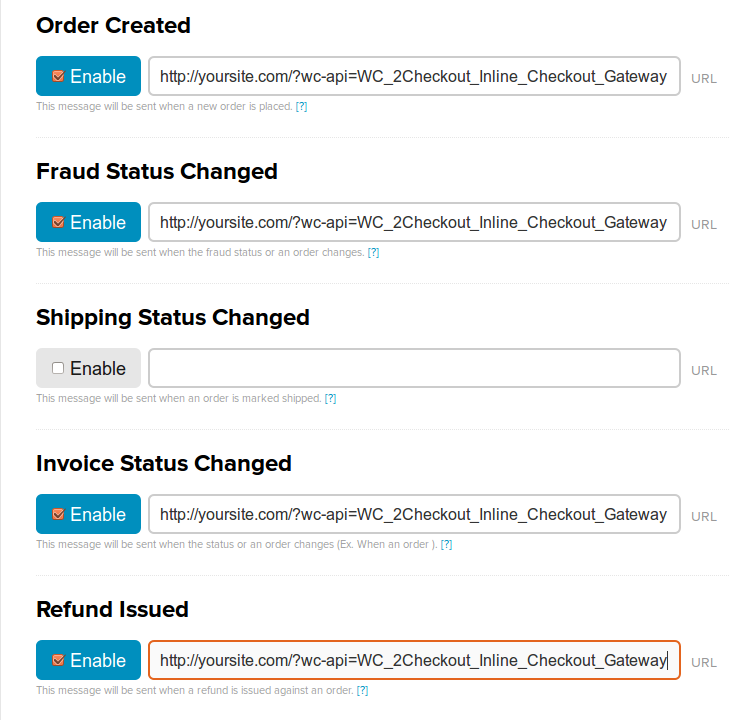
Set up the Notification URL. Click the following button:

Enable the Order Created, Fraud Status Changed, Invoice Status Changed and Refund Issued options and set the URLs. For example:
http://yoursite.com/?wc-api=WC_2Checkout_Inline_Checkout_GatewayPlugin Setup
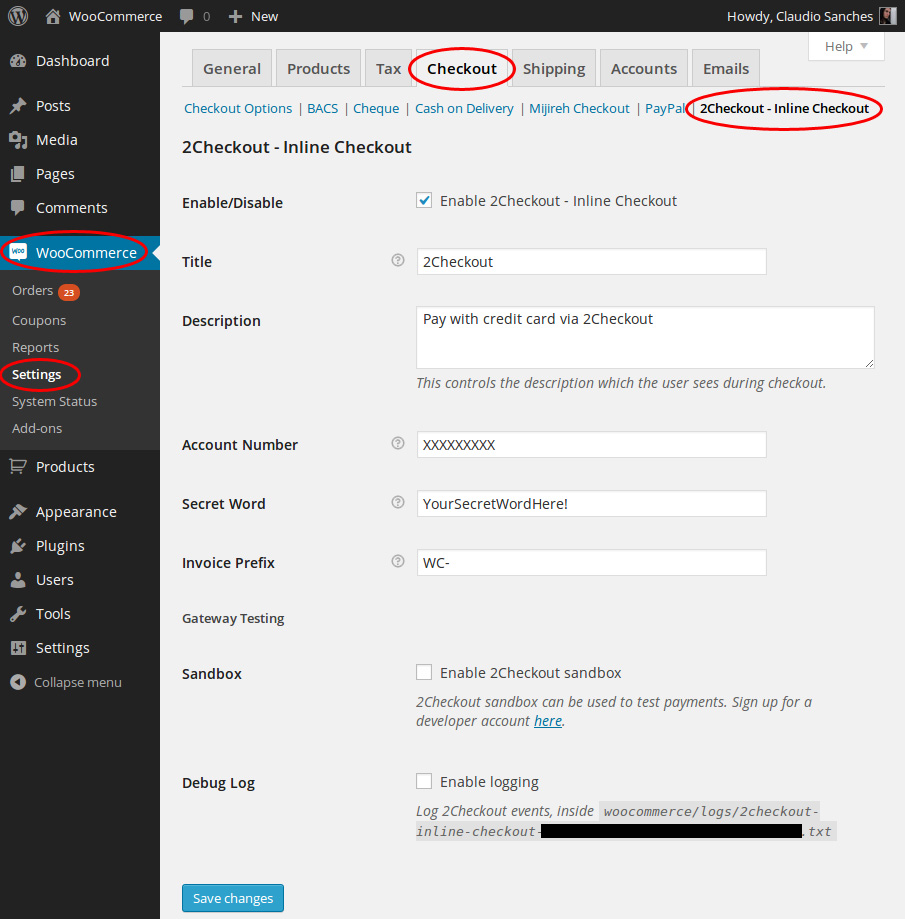
- Go to WooCommerce > Settings > Checkout > 2Checkout – Inline Checkout.
- Enter your 2Checkout Account Number and Secret Word.
How to install a plugin
To install and activate your new plugin/extension:
- Go to your WooCommerce Account Dashboard Downloads page.
- Click the Download icon to download the plugin .zip file to your computer.
- Go to: WordPress Admin > Plugins > Add New to upload.
- Select Upload Plugin at the top.
- Choose File and select the .zip file you downloaded in step 2.
- Install Now.
- Activate the plugin.
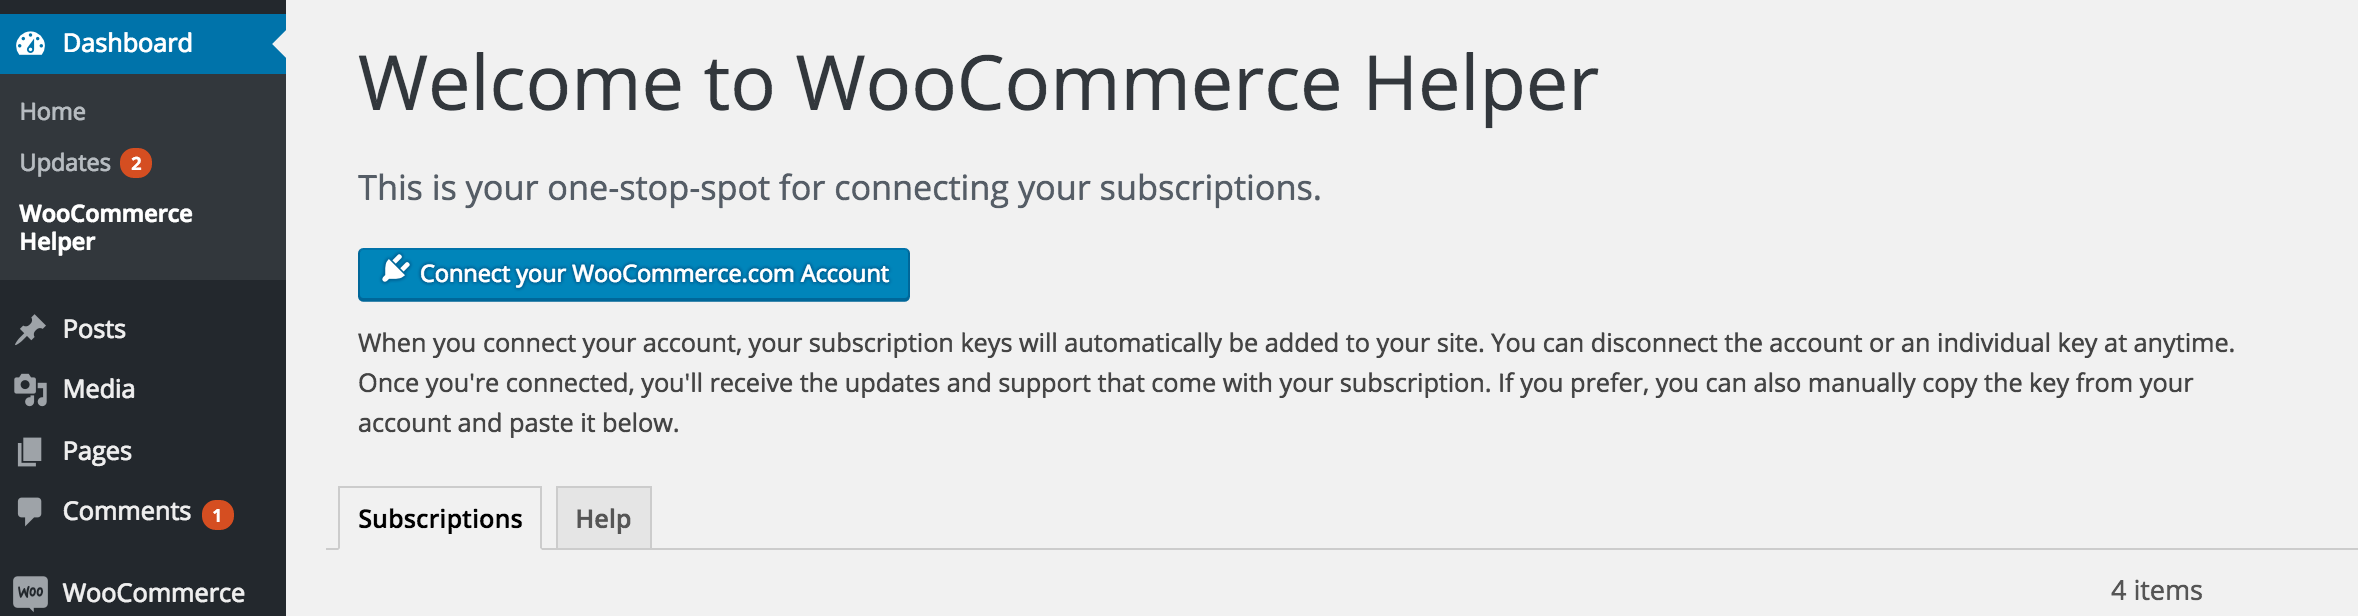
WooCommerce Helper
Upon your first WooCommerce Plugin activation, a notice to Install & Activate will appear for the WooCommerce Helper plugin (previously called WooThemes Updater).
Once installed, go to your WordPress site Dashboard > WooCommerce Helper to connect your WooCommerce keys. Connecting key(s) in WooCommerce Helper will enable update notifications that alert you when a new version of a plugin is released.
It is strongly recommended that you always have the most recent version of WordPress, your theme and all plugins to avoid possible issues. This is always the first step in troubleshooting an issue.
Connect your subscription key
On the Subscriptions screen, you should see all installed products with an option to connect your key.
To automatically connect keys:
- Click the Connect your WooCommerce.com Account button.
- Log into the appropriate WooCommerce.com account, if needed.
- Click Connect Account.
All keys are inserted for you.
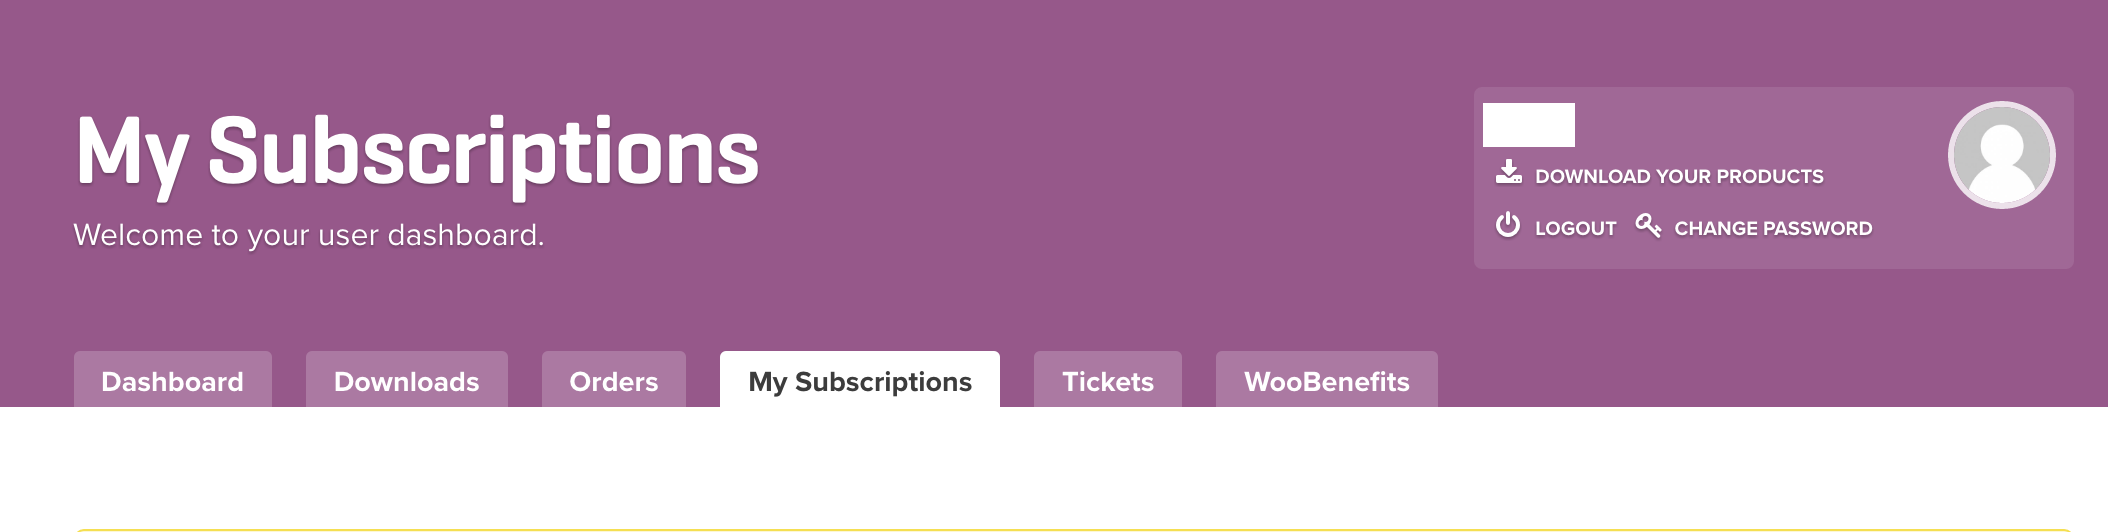
To manually connect keys:
- Log into your WooCommerce Account.
- Go to My Subscriptions to copy the key.
- Go to: WordPress Dashboard > WooCommerce Helper menu option to enter your key. If you are running a Multisite Network, go to the Network Admin > Dashboard to find the WooCommerce Subscriptions option.
- Connect Subscriptions to save.
You need to have a connected key for your plugin or extension to receive:
- Two-click updates of the plugin/extension
- Support for the plugin/extension through our Help Desk
Note: We only provide support on tickets for websites that have authenticated keys.
Deactivate/reconnect your subscription key
1. Go to your WooCommerce Account Dashboard > My Subscriptions page: https://www.woocommerce.
2. Deactivate the key.
3. Copy the key from the product(s) you need.
4. Go to your WordPress site Dashboard > WooCommerce Helper > Subscriptions tab.
5. Reconnect by pasting the key into the field of your product.
6. Connect Subscriptions to save.
We also recommend this as a troubleshooting step if you see a message saying your keys are deactivated or need to be activated.
Missing product or key
Should your purchased products not display on the My Account page, contact us and be prepared to provide an order number for the plugins/extensions that are not on your account.
In the majority of cases, products and keys are on another WooCommerce account or were bought on behalf of a client and are on their account.
WooCommerce 2Checkout Inline Checkout 1.1.10 ExtensionGet it now
http://getlot.co/shop/woocommerce-2checkout-inline-checkout-extension/
posted by Unknown @ 12:04
0 Comments
![]()

0 Comments:
Post a Comment
Note: only a member of this blog may post a comment.
Subscribe to Post Comments [Atom]
<< Home