WooCommerce Follow Up Emails 4.4.19 Extension
WooCommerce Follow Up Emails 4.4.19 Extension
Download
http://getlot.co/shop/woocommerce-follow-emails-extension/
Get it now


 Edit: This opens up the email for editing. The screen will display an editor for the email with its current content and settings. Changes can be made to any part of it before saving it. (The functionality of the editing screen is explained on the “Creating a New Email” page.)
 Clone as: Will clone an exact copy of an existing email with a newly defined name. This feature is useful when creating a new email that is slightly different from the one being cloned. So instead of going through the entire email creation procedure all over again (typing in content, etc.), a few simple changes can be made to the cloned copy, and you’re set to go with a new email.
 Delete: Will delete an existing email. This should only be used if you are sure the email (or a similarly formatted email), will not be used again. If there is a chance that it will be used (or used as a template for another email), it should be sent to the “Archived” section.
 Send: This applies only for the “Manual Emails” type, and opens up a screen that allows you to make a few quick edits to the currently existing email, and send it immediately to any email address or a grouping of email addresses. This is explained on the “Manual Emails” page. Note that there is no “Clone as” option for Manual Emails.
 The last item on the email summary page is a menu for Bulk Actions. Any selection from this menu can operate on several email campaigns at once after selecting the appropriate check-boxes in the left column of the summary table. One of the Bulk Actions can then be selected and applied for multiple emails at once. So instead of changing email status one email at a time, you can apply one of the Bulk Actions to save time.
 We now have enough information to create a new email and try it out! Although there are many new features included here, we have designed the email creation process to be simple and easy, so you can have some fun when creating various emails for various purposes.


Once that is configured you can enable or disable Delete Messages, and set how many times Follow-Ups should attempt resending any soft bounces. This includes an interval set in minutes between tries. After it exhausts the tries it’ll mark it as a Hard Bounce.
Download
http://getlot.co/shop/woocommerce-follow-emails-extension/
Get it now
WooCommerce Follow-Ups
How to Get Started
- Buy this extension
- Download, install, and activate the plugin in your WooCommerce store
- Set up your first email or tweet and make it active
- Wait for your first emails and tweets to be sent
- Watch for your customers to start coming back and buying more!
Keep customers, students and prospects engaged with less work and manual effort
Do you always remember to send a personalized email to follow up with customers? Do you know who your best customers are and continuously nurture them towards an additional purchase or ensure happiness with their last one? Do you want to know when a student is falling behind or has not yet taken a quiz? Do you add new content and communicate this to your audience? Do you segment your mailing lists based on interest?
If you answered no to any of the above questions, Follow-Up emails will change your business for the better. The Direct Marketing Association reports that email marketing ROI is $43 for every dollar spent, making it the most effective marketing channel for driving sales.
Social media is all the rage, and with Follow-Ups you are not left behind. It has yet to become the direct sales driver that emails are proven to be, but it is extremely powerful as a marketing tool. This is why Twitter follow-ups are integrated into this plugin.
Follow-ups will better engage your customers and students by creating complex drip campaigns based upon user interests, course and purchase history to drive more purchases and higher engagement, all with less effort across multiple marketing channels.
Follow-Ups allow you to:
- Email and Tweet your customers and prospects
- Track efficacy of your emails (open/clicks/sends/etc)
- Automate your marketing communications, so you can spend more time selling
- Track customer value to enhance knowledge of your customers
- Stay abreast of your students’ progress, and communicate updates
- Create reminders to ensure no communication is missed
- Optimize your email marketing spend with no outrageous monthly fees
- Create and manage mailing lists to get a complete 360-degree view of your email marketing
- Customize templates for each campaign (or even email) to ensure emails look great on every device
- Personalize your emails with built-in variables and merge tags, as well as support custom variables
- Enhance the WooCommerce email system and integrate it into your marketing plan
Follow-Ups Features
Simple email creation
Follow-Ups use the WordPress editor to create your emails, which means you do not need to learn anything new. Know how to write a post? You can write an email!
Group follow-ups into Campaigns
Easily group your different tweets and emails together into easy to manage campaigns.
Send tweets
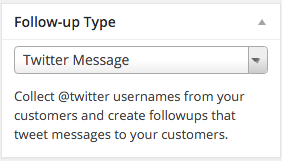
Sending a reminder of follow-up via Twitter is as easy as scheduling an email. We’ve created a Twitter type to make it easy to keep your tweet length in check as well. You can also use our included variables to personalize your tweets.
Full fledged reporting
Don’t limit yourself to simply knowing your email was sent. With Follow-ups, you will get detailed reporting to help you understand the performance.
Know thy students, customers, and prospects
Get a detailed picture of your customers and prospect. See the status of every email sent to a specific email address (customer). Know if they opened a specific email, or better yet, clicked. See the value of the customer by seeing a summary of their orders. Create reminders for yourself, your partners, or your employees to take action on that customer.
Gain unrivaled control over your communications
Follow up Emails provides you with unprecedented insight into the schedule of communications. See everything that is scheduled in the future, and you can opt to suspend, delete, send now, or let it send as planned.
RESTful API
Want to do more? Wish to integrate your own app Follow-ups? Using the full-featured REST API that is included with Follow-up Emails, you can integrate anything you want to utilize Follow ups advanced scheduler and communications delivery vehicle.
Mailing lists
Communications don’t stop with just transactional based emails. Also build, cultivate and manage your mailing lists using Follow-up Emails. Have a list elsewhere? Import it into Followup Emails. Add emails to multiple lists, schedule emails using the scheduler, and segment your lists to your heart’s content.
Free and custom templates
Followup Emails comes bundled with a number of free starter fully-responsive email templates, but its power lies in the built-in email editor that allows you to create your own email templates to match your store, brand, service, and/or campaign. The possibilities for customization are endless.
Personalized coupons
Everybody loves a discount which is why Followups allows you to create coupons that are personalized for your customer, or subscriber, and automatically generate/create/save/report on that coupon for you. Creating a new coupon is simple, and integrating it into the email campaign is even easier.
Newsletters and One-time Emails
Create email templates and newsletters to send to as many of your customer segments as needed. Need to send a specific email to a single Mailing List? Want your employees to use a specific email template when communicating with customers? Follow-ups can allow you to do that. In addition, every email sent is tracked for future use and reporting.
Google Analytics integration
Easily append Google Analytics tracking values onto links in your emails, so that you can track email to purchase funnel using Google’s free analytics tools.
Sensei? We’ve got you covered
Communicate quickly, efficiently and automatically as your students progress through your educational and training programs. Send emails as your learners perform actions, answer questions, and finish lessons. Also, keep yourself in the loop by being notified of your lesson/class status.
Awesome integrations
Follow-ups are directly integrated with many of your favorite plugins and extensions making it extremely easy to send emails and tweets no matter what plugins you are using – even if you do not have WooCommerce installed. In fact, using our API, you can integrate with any service, just install Follow-up Emails and WordPress and you are ready to go!
- WordPress
- WooCommerce
- Sensei
- WooCommerce Subscriptions
- WooCommerce Bookings
- The Events Calendar
- WooCommerce Points and Rewards
- Graphflow
- Google Analytics
Plus, many more features!
- Compound rules – bought this, but not that
- Category/product inclusions and exclusions
- Custom from/reply-to for every email
- BCC support
- 1000’s of trigger event combinations
- 100’s of merge tags and variables
- Support for custom variables
- Archive/unarchive emails for future use
- DKIM and SPF support
- Bounce handling and support
- Support, frequent updates, and custom services from plugin authors
- Much more…
Follow-Ups
Follow-Ups is a versatile extension that can act as an auto-responder and customer relationship tool.
This unique tool will help your business to grow and maintain customer email transactions in an active loop. First, it can replace the built-in WooCommerce email communications to give you, the store owner, an indispensable CRM tool. Second, it gives Sensei users the ability to build automated marketing campaigns for Sensei quizzes, tests, and more!
This plugin enables you to define and create customized emails that are automatically delivered to your customer’s email inbox at defined intervals after completing a specific action such as finishing a quiz, making a purchase, or signing up for an account. For example, in your marketing emails, you could promote other products, offer tests, advertise special sales, send customized coupons, remind users about your products….the opportunities are limitless. You can also request reviews, and by using the Review for Discount plugin, you can offer discounts for shoppers that provide reviews.
Define the emails once, and they continue driving customers back to your site for weeks, months, and years to come.
Installation
- Download the .zip file from your WooCommerce account.
- Go to: WordPress Admin > Plugins > Add New and Upload Plugin with the file you downloaded with Choose File.
- Install Now and Activate the extension.
More information at: Installing and Managing Plugins.
The Interface
As soon as you open Follow-Ups, you’ll get a page as shown below (with some sample emails already created – your install will be empty, of course!) This page will be acting as a cockpit for building your email marketing and customer relationship campaign.
This is the main screen for Follow-Ups, where you’ll see a rundown/summary of all emails you created, and also give you a birds-eye view of total sends, trigger conditions, and other options set for each email. There are seven main menu items for Follow-Ups. Each provides its own set of capabilities and features.
- Emails – This opens up again as the main screen, and provides you with an overview of all the emails that have been created for various action oriented purposes. A number of links are noticeable on the top of this page where you can select the email type that is summarized on the page. The default type is Storewide Emails. Other types are Subscription Emails, Quantity-based Emails (deprecated), Booking Emails, etc. (Some links are only visible with additional plugins installed.)
- Campaigns – This opens a view of your campaigns, and provides ability to edit and add new campaigns. The interface is similar to the category manager interface directly within WordPress. Campaigns span across email types. You can have one or many (unlimited) campaigns. You can group one or many emails per type into a single campaign.
- New Email – Under this link, you will create your new email campaigns. Numerous selectable options are provided for email type, format, style, etc. Design possibilities are only limited by imagination. Various settings are provided on this page that define how and when the email is sent, and how it is tracked.
- Reports – One of the most powerful features of Follow-Ups is the reporting ability of the plugin. We’ve spared no expense in giving you the data you need. Categorized listings for all emails sent, users, opt-outs, and coupons can be viewed. Graphical charts display Top Mails by Opens, Top Emails by clicks, and top Emails or CTOR (click-to-open rate).
- Coupons – The Coupons section includes the standard coupon features you know and love about WooCommerce, while adding a few unique marketing and sales features to provide additional incentives for your customers.
- Scheduled Emails – This section gives you an overview of all the emails that are currently in the queue, and are scheduled to be sent in the near future. The summary includes the recipients email address, order number, name of the queued email, status, and date to be sent.
- Opt-Outs – Yes, it happens with even the best lists and marketing teams… we inform you of who and when an opt-out occurs and provide you with the ability to manually manage this aspect of your marketing.
- Settings – The meat of how Follow-Ups runs. Settings for email styles, permissions, notification emails, and other performance parameters enable your plugin to run exactly the way you want it.
- Templates – This is a new area providing information on new email templates that can be integrated, managed, and editing in Follow-Ups.
Email Types
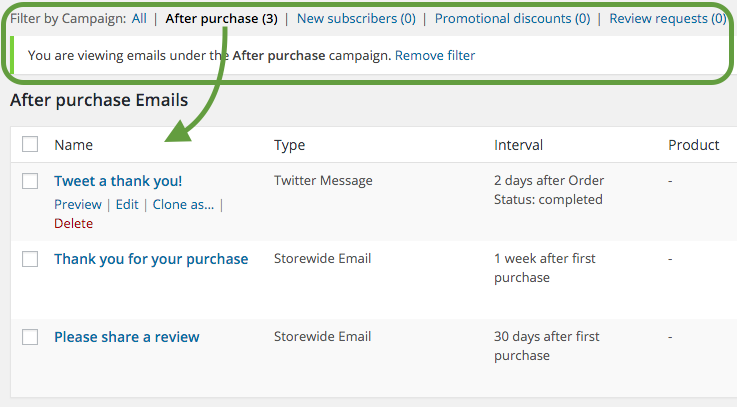
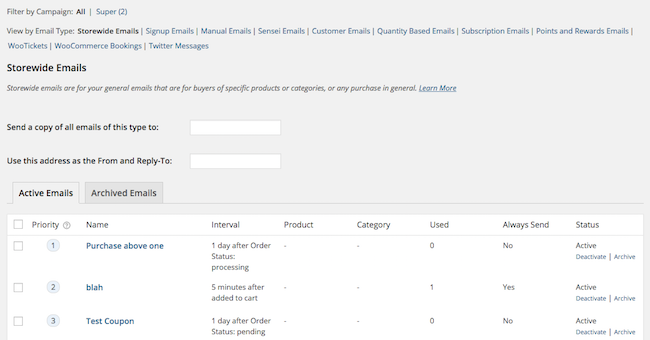
Types of Emails and Extensions – Before we look at emails listed on the main summary page, which opens with Follow-Up Emails -> Emails, it is important to understand that all of the emails shown on this page are categorized into a certain email type.
The various email types are listed on top of the summary page. Any time an email is created, it will have a suitable email type selected for it. Each email type is designed for a different type of email function and used for a specific purpose in your marketing campaign. (Note that some types are only visible if an additional plugin is installed.) Clicking a link for an email type will show you a summary of all the emails created under that particular type. For example, if you click “Signup Emails”, you’ll see:
A brief description of the purpose and functionality of the selected email type appears just below the links area. Below this, you’ll see two text box for email addresses. In the first one, you can type in an email address where a copy of each email of this type will be sent as it is being sent to a customer. (This is the BCC email addressing option.) The other one is the “From/Reply-To” email address, that is sent along with your email that the user can reply to. This is the sending source of the sent email. (Note that any email addresses entered here will apply only to the selected email type.)
The purpose and functionality of each email type can be described as follows:
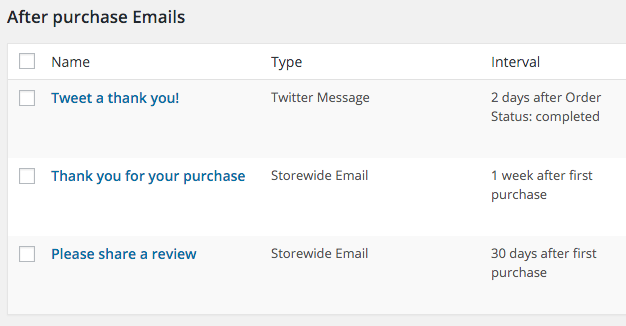
Storewide Emails: Storewide emails are usually sent to a buyer after making a purchase. This is usually a “Thank You” message, but it could also contain updated information about the purchased product, or other news or marketing strategies that could be of some value. Storewide Emails can be sent at any stage of the ordering process, and would inform the buyer of any change in the order, warranty, or refund status. The criteria for sending Storewide Emails is defined when creating your emails.
Signup Emails: Sign up emails are normally sent after a new user signs up or completes a registration form for your store. This enables you to send emails to potential customers who are not yet ready to buy a product. Maybe the user signed up to become eligible for a discount or get future communications. Regardless, Follow-ups knows about this “transaction,” and allows you to keep the communication loop open and automated. Signup Emails are sent based upon the criteria defined when creating your emails.
Manual Emails: Manual emails allow you to create email templates for you and your team to utilize when you need to send emails immediately to customers or prospective customers. Once your email template is created, you can quickly pull it up on an editing screen by clicking “Send” as you hover the cursor over the email name on the summary page. Then you can enter an email address (or select a grouping of email addresses), make a few quick edits if needed, and click “Send Email Now”. The email grouping feature allows you to send a manual email to a group of customers or users all at once, based on set criteria. For example, the email could be sent to all customers who made a purchase in a date range, or all customers who purchased specific products. See the “Manual Emails” page for more information on using manual emails.
Sensei Emails: Follow-ups for Sensei is a powerful email course management system for keeping your students, customers, and learners informed, up-to-date, and on top of updates to your Sensei course management program. Sensei emails can be sent to users during any phase of a course, lesson, or quiz, from signup to completion. Your emails can describe a course outline, specific instructions for completing a quiz or lesson, grading system, or a student’s progress in a quiz/course/lesson/test. The sending criteria is defined when creating your emails.
Customer Emails: Customer specific emails will re-engage your customers in the future by following up with emails specifically related to previous purchases, such as updates to products, information on related products, or other news or marketing strategies that could be of some value. The sending criteria can be based on the date of a recent purchase, number of orders made, or total amount spent on a single purchase or on all orders.
Quantity-based Emails: This email type is (deprecated). If you currently have this type created, please switch to Storewide emails and delete these emails – it will not delete the historical reporting.
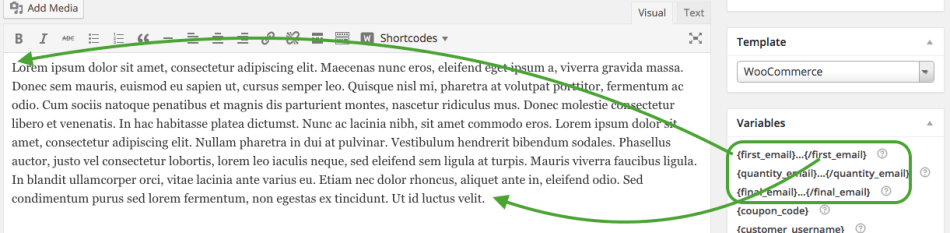
Quantity-based emails will be sent to customers based on a scheduled delivery related to the quantity of items purchased. They will automatically trigger when the next delivery is scheduled. For example, if a customer buys six air fresheners, with one air freshener delivered per month, the customer would receive a reminder email every 30 days until the order has been fulfilled (six emails total). Follow-ups provides variable options to customize the first, last, and intermediate emails in the series (see “Quantity-based Emails” in the “Email Types” page for more information.) Please note: for these emails to work, you must use the variables for the email series, for example: {first_email}…{/first_email}. If not, these emails will be blank.
Subscription Emails: Subscription emails will be sent to customers based upon the subscription status you define when creating your emails. You can include information in your emails about discounts available for having a subscription, for trying out a free trial, or just signing up for a subscription. Subscription emails are usually sent to inform a customer about a subscription that is about to expire, or any status change associated with a subscription, such as activation, renewal, suspension, or cancellation.
Points and Rewards Emails: Sends automated emails to customers when they earn points, when they earn points milestones, or to simply remind them to use their points and shop. These emails can let a customer know what kind of benefits are provided upon reaching a certain milestone, or what rewards are available. Points and Reward Emails are sent based upon the criteria defined when creating your emails.
WooTickets Emails: Sends automated emails to customers that sign up and buy tickets to your WooTickets events. WooTickets Emails works with The Events Calendar plugin to manage all ticket activity for listed events. Emails of this type are usually sent just after a customer buys a ticket, or just before the event. These emails can also inform your customers about any status change associated with the ticket or event. The criteria for sending emails based on event/ticket status is defined when creating your emails. Learn more about this email type here.
WooCommerce Bookings: WooCommerce Bookings is an extension that allows you send follow-ups to customers that book appointments, services or rentals for a specified time or date. Customers are given options such as availability, pricing, persons, and resources when booking a product. Bookings Emails can be sent at any time during a booking process from initial signup to completion of the booking. These emails could remind customers just before the booking date, or inform them of any change in booking status. The criteria for sending emails based on booking status is defined when creating your emails.
There is a lot of flexibility when setting the criteria for sending emails of the various types. An email of one type may have the same content and criteria as an email of another type, such that they overlap. For example, a Customer Email could have the same design as a Storewide Email. To avoid confusion, try to limit emails with similar content and criteria to one type.
It often happens that more than one email of a certain type can meet the criteria for a single purchase from a given customer. In cases like this, priority conditions can be set so that only the email with the highest priority is sent. For example, when a customer buys two or more products of different product or category types, the criteria might be met for several emails. If priority conditions are set for each email, it ensures that the right email goes out to the right person at the right time. This also prevents multiple emails from being set to a single customer, which could create spam. (See “Priority” below for more information.)
If a customer makes a purchase at a later date, such that the criteria is met again for an email that is already scheduled to be sent, there is a way to avoid multiple emails for this. The Adjust Send Date option should be used, which adjusts the send date of the scheduled email to further in the future, instead of adding another email to the queue. This is explained in Creating a New Email.
Check the “Email Types” page for more details about each email type.
Email Type View Explained
The top of the summary section shows two tabs: Active Emails & Archived Emails. Each email type (except for Manual Emails) will have a set of active and archived Emails. Under the “Active Emails” tab, you’ll see a list of all current emails of the selected type that are either activated or temporarily deactivated. Any email in this list can be sent to the archived section listed under the “Archived Emails” tab. This helps to clean up and organize the Active Emails list. The “Archived Emails” section should contain only those emails that are no longer used, or won’t be used in the near future. It is still possible to reactivate any of the emails listed under this tab should the need for it arise. Sometimes an archived email will have a similar format that could be used for a new email, and it would be more convenient to reactivate it and make a few quick changes, rather than creating a whole new email.
Each of the emails on the summary page are listed under the “Name” column in a table with several other columns. The column headings might differ slightly for each email type. Each column provides some descriptive information about each individual email.
The basic column headings are:
Priority: This is the first column, and sets the priorities such that all emails in the list are listed in in order of importance. All emails can be arranged from top to bottom by dragging and dropping the emails in the desired order. Because Follow-Ups only sends one email for a purchase by default, we algorithmically select the email to send based upon the highest priority when a customer buys from two or more categories or product types in a single purchase.
Name: This is the name of your email campaign. The name should be chosen to correlate with the email’s intended purpose. The name is a clickable link, which allows you to edit the email as needed.
Interval: This describes the trigger conditions of how and when the email will be sent. Intervals can be set to send emails at a defined time after (or before) a certain event, or according to a periodic schedule. (See the “Triggers” section on the “Creating a New Email” page for more information on intervals.)
Product or Category: The product or category status is shown if the email is to be sent only if it relates to a certain product of product category (such as Clothing or Music).
Used: This column is a quick snapshot of how many time this email has been sent over the life of the email.
Always Send: This is an override for the Priorities defined above. Consider this scenario: Customer A buys product A and B. You have a Follow Up Email set for three days after a purchase of product A and B. Which do you send? With the priorities set for your emails, you can tell Follow Up Emails which email is more important, and thus which to send in this scenario. But, with “Always Send,” you have the option to send both emails. If “Always Send” is enabled, then Follow-Ups will send that email, every time it satisfies the criteria, regardless of priority. Whenever a campaign is set to “Always Send,” Follow-Ups will simply ignore all other rules, and always send that email, even if it means that your customer will receive multiple emails after a single purchase. (The priority rules still hold for the other email campaigns where “Always Send” is disabled.) This is a risky setting, and could potentially spam customers, so it’s important to be very careful when using it.
Status: The status of an email campaign is shown as either “Active” or “Inactive” under the “Active Emails” tab. An “Active” email can be switched to “Deactivated” (Inactive) status at any time, and vice versa. Inactive emails will not be actively queued for the email campaign, even if they meet the criteria. Any email can also be Archived at any time if you think it won’t be used in the near future. This keeps the Active Emails list neat & clean. The status of all emails under the “Archived Emails” tab is “Archived”. Any email in the “Archived” list can be restored to “Active” status. This feature keeps you from having to delete and recreate emails in the future.
Sub-Menus for Individual Emails
Any email can be Edited, Cloned, or Deleted at any time by hovering the cursor over the email’s name, and clicking the appropriate option as necessary. The “Manual Emails” type will have one additional option for Send.
Edit: This opens up the email for editing. The screen will display an editor for the email with its current content and settings. Changes can be made to any part of it before saving it. (The functionality of the editing screen is explained on the “Creating a New Email” page.)Clone as: Will clone an exact copy of an existing email with a newly defined name. This feature is useful when creating a new email that is slightly different from the one being cloned. So instead of going through the entire email creation procedure all over again (typing in content, etc.), a few simple changes can be made to the cloned copy, and you’re set to go with a new email.Delete: Will delete an existing email. This should only be used if you are sure the email (or a similarly formatted email), will not be used again. If there is a chance that it will be used (or used as a template for another email), it should be sent to the “Archived” section.Send: This applies only for the “Manual Emails” type, and opens up a screen that allows you to make a few quick edits to the currently existing email, and send it immediately to any email address or a grouping of email addresses. This is explained on the “Manual Emails” page. Note that there is no “Clone as” option for Manual Emails.Bulk Actions and Priorities
The last item on the email summary page is a menu for Bulk Actions. Any selection from this menu can operate on several email campaigns at once after selecting the appropriate check-boxes in the left column of the summary table. One of the Bulk Actions can then be selected and applied for multiple emails at once. So instead of changing email status one email at a time, you can apply one of the Bulk Actions to save time.
After any Bulk Action is applied, the Update Priorities button must be clicked to reorganize the list according to priority.
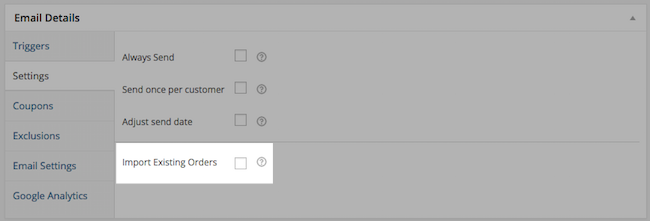
Note: Some email types will have one extra item in the Bulk Actions list called “Import Orders”. This option is available only for emails that relate to customer orders: Storewide Emails, Customer Emails, and Subscription Emails. Manual Emails will have only one option in this list: Delete.
Creating a New Email
We now have enough information to create a new email and try it out! Although there are many new features included here, we have designed the email creation process to be simple and easy, so you can have some fun when creating various emails for various purposes.
To begin your email creation process, just click Follow-Up Emails -> New Email to open up the email editor (or you can click Add New on the main summary page). A screen will open as shown below, You are now ready to create your email.
Email Name: The first step is to choose a name that would be suitable for your email. The name will be referenced on the summary page as a clickable link. This link can be clicked if you need to review or make changes to the email in the future.
Email Subject: Under the name is a text-box for the subject line. This is the text that will appear as the subject heading whenever this email is sent. You should choose suitable wording for the subject line that corresponds with the basic intent of the email.
Email Type: A drop-down menu is shown on the top right of the screen, where the email type should be selected. Each of the email types were described on the “Email Summaries” page. Choose the type that would be the best match for the function of your email. Other emails should be also be considered along with this. Most email types are associated with another plugin, which handles the email sending process. (Note that some of the settings on the editing screen are disabled until an email type is selected. This is true for Variables, and all settings in the “Email Details” panel, which is explained below.)
Campaign: Emails can now be grouped into campaigns. You can type in a new campaign for the email, or select from an already created campaign.
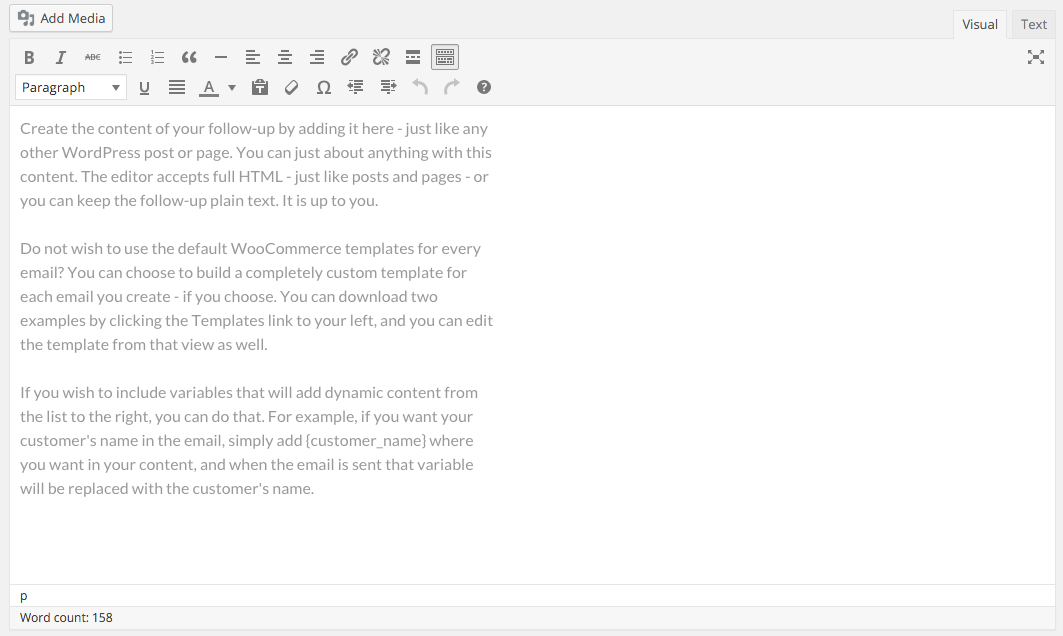
Email Content: Now you are ready to create some content for your email. A large text area is shown that you can work with as you please. All of the basic editing functions are included that allow you to modify the text as needed. Another toolbar is shown by clicking the “Toolbar Toggle” icon. The email can be composed in Visual or Text (HTML) format.
Variables: Several Shortcodes and replacement variables are available to make it easier to manage the content of the email for different customers, products, order numbers, etc. The variables listed here are actually customized fields that can be copied and pasted in any part of the email content to generate dynamically changing text that varies from one email to the next. For example, if a customer purchased a specific product, the {item_name} variable would be the replacement variable for the product name in your emails. Just place {item_name} where you want the product name to appear, and the product name is automatically placed in that location when the email is sent. The email you just created is actually a template email, that fits into it the various names, numbers, and other parameters just before it is sent. There wouldn’t be any need to update or monitor emails as they are sent to customers. Everything is take care of automatically.
There are several built-in variables that can handle just about any name, number, or other parameter associated with the individualized email to be sent. There are also specialized variables, that are only used when a specific email type is used. For example, a Sensei email would have additional variables for test name, course name, and start date of course. See the “Email Types” page for a full listing of all the variables that are used for each email type, along with an explanation of how they are used.
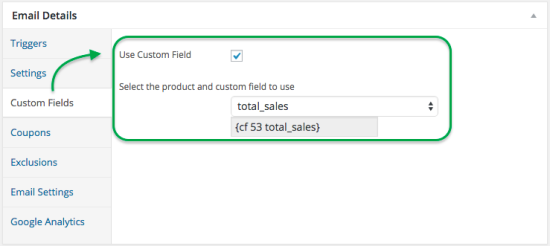
Custom Fields as Variables: You can utilize the content stored in custom fields as replacement content in your emails if you have set up your email to be sent for a specific product. If this is the case, you will be presented with a new option within Email Details to enable these.
Email Details: Now that you have a title, heading, and some content for your email, you need to set the various “Email Details” parameters, which specifies exactly how and when the email will be sent. Clicking the “Email Details” panel just below the email content area will open a menu for six types of settings, as shown here:
Note that certain email types may not have all of these six setting types listed for them. For example, a Subscription Email does not have the Exclusions setting, because there are no products or product categories associated with this email type. The six settings types can be explained as follows:
Triggers: This is where we set the scheduling or timing for sending an email relative to a selected event trigger (such as a purchase). If you click “Triggers”, a window opens up with menus for setting time, units of time, and the event which will be used to trigger the email.
Selecting the time value and time units determines the interval of time relative to an event (before or after), which will trigger the email at the precise time it is to be sent. A numerical value for the interval time must be entered, plus a selection for units of time, which are as follows:
- Minutes
- Hours
- Days
- Weeks
- Months
- Years
The following list will give you a general idea of the types of events that can be used to trigger an email. Note that these events can vary according to the email type selected. For example, a Sensei email can have an event for “After signing up for the course” or “After course is completed”.
- Customer’s first purchase – this is based upon the first purchase associated with the buyer’s email address
- Customer’s later purchases – this triggers the email for any subsequent purchases made after the first purchase
- Cart abandonment – will trigger the email after a product is added to cart (will only work if the user is logged in, and has a known email address) – learn more about how to set up cart abandonment emails here
- Any status change (for example: warranty status, order status, processing status, or refunded status)
- Events associated with email type – possibilities include subscription activated, points earned, sign-up for a course, ticket status, etc.
- Customized statuses – any status type on the free custom statuses plugin can be used (this is supported by Follow-Ups).
See the “Email Variables” documentation for a full list of the available variables by Follow-up type.
Settings: Clicking “Settings” will open a selection window with check-boxes for four email sending options, that make sure the email is handled correctly, and either sent or not sent depending on various conditions:
Always Send: Enabling the “Always Send” option will allow the email to be sent anytime it satisfies the criteria set for it. This will override any priority rules set up for emailing, which only sends the email with the highest priority, if more than one email satisfies the criteria. This setting should be used with caution, since multiple emails might be sent for a single purchase. This is explained more in the “Always Send” section of the “Email Summaries” page.
Send once per customer: Checking this option will make sure each customer will receive the email email only once, and will never be repeated, even if a similar product is purchased in the same category. Emails using this option are usually a “Welcome” message, to let the customer know that the store is glad to have them as a customer, and could invite the customer to explore the store’s website and purchase other products. This email should be placed at the top of the priority list if “Always Send” is not enabled for it.
Adjust send date: Enabling this option will make sure that the same email is not sent twice to the same customer if it is already stored in the queue for a future send. So instead of adding another email to the queue, the send date of the email already in it will be changed to a date further in the future.
Import existing orders: Checking this option will cause any of the existing orders that are not processed yet to be imported if they match the email criteria. You can also do this from the bulk action menu.
Note that certain email types may not have all of these four “Settings” options listed for them. For example, a Sensei Email does not have the “Always Send” and “Import existing orders” options because there are no products or product categories associated with this email type.
Custom Fields: Once you have selected a specific product for your email to be sent for, you will see a new option appear. Simply click the checkbox for “Use Custom Fields” and a dropdown will appear. You can select the custom field you wish to insert into your email, and it will show you the replacement variable to use in the content body of your email.
Coupons: Clicking this option will open a check-box asking you whether or not you want a coupon code generated and sent along with your email. If checked, a drop-down menu opens up where you can select the coupon which will be used for the email. The procedure for creating coupons is explained below in the section title “Coupons”. The coupon itself is created on this page:
http://yourdomain.com/wp-admin/admin.php?page=followup-emails-couons&action=new-coupon).
http://yourdomain.com/wp-admin/admin.php?page=followup-emails-couons&action=new-coupon).
Please note: You must first create the coupon in Follow-Up Emails > Coupons before the coupon variables will actually work.
Exclusions: Clicking “Exclusions” opens up another set of selection areas, where you can select those products or product categories which will disable the email from being sent if the customer has previously placed an order in one of them. There is also a drop-down menu for “Exclude these categories”, which will disable the email from being sent if it relates to any of the categories selected.
Email Settings: This option will open two text-boxes for email addresses. The first one is a BCC email address of where you want a copy of each email sent to, and the other one is the email address that is sent along with your email that the user can reply to. This is the sending source of the sent email. (Note that any email addresses entered here will apply only to the current email being created/edited. These email settings options are also provided on the summary page for all emails of a selected type.)
Google Analytics: The “Google Analytics” option will ask whether you’d like Google Analytics tracking with the email links. This is a powerful tool that will allow you thoroughly analyze your email marketing program. If you click the checkbox, you will be presented with the input field below. Then you should click the link for the URL Builder tool, where you can obtain a link tracking URL to insert in the text-box. This URL will contain all the information needed to track every link in your emails on Google Analytics.
Enable For: We can now finish up the email creation procedure by checking a few more options related to category types and/or product types. For some email types, a selection can be made to send the email for any product, or only for a specific product or product category. This would allow an email to be sent only if it relates to a single product or category, if desired. The selection for this is found in the lower part of the right column under “Enable For”. Some email types don’t relate to any products, so a different set of selectable options would apply. For example, a Sensei email would have options for Course, Lesson, Quiz, or Question Answer.
Send Test: Before publishing the email for sending, an option exists for sending a test email to any email address. For most email types, all you have to do is enter an email address, and click “Send”. If you are testing a “Storewide Email”, you should also enter in a product or order number, depending on which option is selected in the drop-down menu. Storewide Emails are usually sent based on a particular product or order as a customer makes a transaction. If your test email didn’t turn out right, any of the previous steps of creating or editing an email can be modified at any time as needed to make corrections. Navigation is possible directly on the edit screen for any of these steps. It will store current progress automatically, or by clicking “Save”.
Publish: This is the final step that actually installs your new email in the system. Clicking “Publish” will create the new email for future use, and allow it to be modified at any time thereafter. Once an email is Published, and you decide to make a few changes, a “Save” button will appear instead for saving the changes. Options also exist for deleting the email or changing its status. The status can be changed to Active, Inactive, or Archived in the drop-down menu. If the status is changed, the “Publish” button will reappear again.
Summary of Email Creation Process
All of the settings options described above to create an email require careful consideration in order to maximize customer satisfaction. It should also be noted that the order of the settings procedure doesn’t have to be as described above, but as long as you have the “Email Type” selected, any option can be set before moving on to the next (The Variables and any settings under the “Email Details” panel can’t be used unless an email type is selected first).
Once the new email is published, it can be brought up again for editing anytime by clicking its name on the summary page (or by clicking “Edit” under the name). The same editing screen will open up again with the current email content and settings.
All of the options and settings described above for creating or editing an email are summarized here in a list:
- Email name: The name or title of the email, which will be used as a reference.
- Email subject: This is the subject heading of the email.
- Email type: The email must be categorized according to its function or purpose.
- Email content: This is the body of the email, which is composed in the text area.
- Variables: These are the replacement fields that can be inserted in the email content that are dynamically updated with the associated text as the email is sent.
- Always send: Sends the email if it satisfies the criteria, regardless of prioritization.
- Send once per customer: Makes sure the email is only sent once per customer.
- Adjust send date: Adjusts the send date of an email already in the queue if the same email matches the criteria again (This makes sure the same email is not sent twice to a customer)
- Import existing orders: Checking this imports orders that match the email criteria.
- Interval: This menu option sets the amount of time relative to an event (before or after), which will cause a trigger at the precise time the email is to be sent.
- Available triggers: In this menu, an event is selected that triggers the email to be sent (such as first purchase, warranty status changed, etc.). The email will then be triggered and sent relative to the time set for Interval (before or after), if it satisfies all other conditions set as criteria.
- Relative timing: This is the before or after event. For example, I want this email to send X days after the Y trigger occurs.
- Enabled products or categories: These selectable options enable the email to be sent for any product, or only for specific products or product categories. (If the email type is not associated with any products, a different set of options will apply.)
- Disabled products or categories: This menu option disables the email from being sent if a customer has previously purchased the selected products or products in the selected categories.
- Exclude these categories: This option will disable the email from being sent if it relates to any of the categories selected.
- Send coupon code: Allows you to select a coupon and generate a coupon code to be sent along with the email.
Email Campaigns
Custom Templates
Email Variables
Custom Variables
Cart Abandonment Emails
Event Triggers
Follow-Ups provides each email type with a different set of events that trigger an email to be sent if it matches the criteria. An email type must be selected for the email you’re creating/editing in order for the corresponding triggers to appear on the main editing screen. The event triggers for a particular email type are listed in a drop-down menu in the “Triggers” section on the the “Email Details” panel.
There aren’t any event triggers that are common to all email types, so all the event triggers are listed separately for each email type below. Storewide emails are also unique in that the trigger can have additional, multiple requirements (unlimited). Note that the triggers for some email types can be used only if another plugin extension is installed and activated:
Storewide Emails:
After first purchase
After added to cart
After customer purchased more than one time
After order status: any
After warranty status changes
After refunded manually
After refunded successfully
After refund failed
After added to cart
After customer purchased more than one time
After order status: any
After warranty status changes
After refunded manually
After refunded successfully
After refund failed
Additional requirements
Customer bought these products
Customer bought from these categories
On first purchase
Order total above
Order total below
Total orders by customer above
Total orders by customer below
Total purchase amount by customer above
Total purchase amount by customer below
Customer bought these products
Customer bought from these categories
On first purchase
Order total above
Order total below
Total orders by customer above
Total orders by customer below
Total purchase amount by customer above
Total purchase amount by customer below
Signup Emails:
After user signs up
.
Manual Emails:
.
Manual Emails:
No triggers are needed for this type
Sensei Emails:
After selecting a specific answer
After signing up for a course
After course is completed
After lesson is started
After lesson is completed
After completing a quiz
After passing a quiz
After failing a quiz
After signing up for a course
After course is completed
After lesson is started
After lesson is completed
After completing a quiz
After passing a quiz
After failing a quiz
(These triggers are available only if the Sensei plugin is installed and activated.)
Customer Emails:
After last purchase
After order total is above
After order total is below
After customer purchased more than one time
After total orders by customer is equal to (or greater than)
After total purchase amount by customer is equal to (or greater than)
After order total is above
After order total is below
After customer purchased more than one time
After total orders by customer is equal to (or greater than)
After total purchase amount by customer is equal to (or greater than)
Quantity-based Emails:
This email type is (deprecated). Please use Storewide emails.
Subscription Emails:
After subscription activated
After subscription renewed
After subscription cancelled
After subscription expired
After subscription suspended
After subscription reactivated
After a renewal order has been created
Before next automatic subscription payment (works for manual renewals as well)
Before active subscription expires
After subscription renewed
After subscription cancelled
After subscription expired
After subscription suspended
After subscription reactivated
After a renewal order has been created
Before next automatic subscription payment (works for manual renewals as well)
Before active subscription expires
(These triggers are available only if the WooCommerce Subscriptions plugin is installed and activated.)
Points & Rewards Emails:
After: points earned
After: earned points is greater than
After: earned points is greater than
(Only available if the WooCommerce Points and Rewards plugin is installed and activated.)
(Only available if the WooCommerce Tickets plugin is installed is installed and activated.)
WooCommerce Bookings Emails:
Before booked date
After booked date
After booking is created
After booking status: unpaid
After booking status: pending
After booking status: confirmed
After booking status: paid
After booking status: cancelled
After booking status: complete
After booked date
After booking is created
After booking status: unpaid
After booking status: pending
After booking status: confirmed
After booking status: paid
After booking status: cancelled
After booking status: complete
(Only available if the WooCommerce Bookings plugin is installed and activated.)
Additional requirements (conditions)
On storewide emails you can create additional requirements beyond the initial trigger for that email that you are creating. This allows you to set more complex conditions for setting emails. For example, you might set an email to be sent after a customer buys widget X AND also bought previously from a product or set of products. You could also get more complex by saying that the customer that buys widget X AND has total purchase amount with your store above $500 AND the current order that includes widget X is less than $100 total. The flexibility and complexity is for you to define. The following are the additional requirement triggers that you can define:
- Customer bought these products
- Customer bought from these categories
- On first purchase
- Order total above
- Order total below
- Total orders by customer above
- Total orders by customer below
- Total purchase amount by customer above
- Total purchase amount by customer below
Signups, Subscriber Lists, and Email Newsletters
Follow-Ups supports subscribers and mailing lists/newsletter. Now you have the ability to sign up subscribers, and send/schedule manual emails to these subscribed users. Much like any email subscription list, you can gather email addresses using a shortcode with five elements. The shortcode is:
[fue_subscribe label="Email:" placeholder="Your email address" list="Special customers list,Customers that like bananas list" submit_text="Subscribe" success_message="You have been subscribed!"]
The shortcode must always start with fue_subscribe, and then you should include five elements that should always be within the quotes:
- label – This is text that will come in front of the input box. In the example we use “Email:”.
- placeholder – This is the text that will be in the text input area where the user would enter their email address. In the example we use “Your email address”.
- list – You can assign subscribers to specific lists, so that you can target different subscribers with different emails. You can use more than one list per form. For example, you can use
list="List2,List1". Also, the list does not have to be created. It will be automatically created when the user subscribes. - submit_text – This is the submit button text. In the example we use “Subscribe”.
- success_message – This is the message shown to a subscriber after clicking the submit button. In the example we use “You have been subscribed!”.
These users, once added are stored to a new location in Follow-Ups – the subscriber table. You can view this section by clicking on “Subscribers” in the Follow-Ups menu. This will take you to a screen where you can see your subscription list, and the date and time each user subscribed to your list, and what list these subscribers are on.
In this list view you have the ability to manually add a single email address, or remove an email address.
You can also manage the lists that these subscribers are on, so that you can more finely target them in email campaigns or email newsletters. This could also allow you to collect information about users purchase preferences – say, for example, you want to know whether the user like skiing and snowballs, but not snowboarding and eskimos. It is really entirely up to you.
You can add users to new lists, remove them from existing lists or delete these subscribers altogether.
Manual emails can now also be sent at a specific date and time, so that you can schedule emails to your subscriber list.
Settings
Follow-Up Emails -> Settings will bring you to a page where a number of setup options and settings are configurable. These pages are General Settings, Permissions and Styling, Email Settings, Authentication, Subscribers, Documentation, and Integrations.
General Settings
Clicking the “General Settings” tab opens a panel where the general maintenance can be handled.
Backup & Restore: The “Backup & Restore” function is important whenever you decide to upgrade WordPress, WooCommerce, or any of the extra plugins associated with an email type. In order to avoid losing any important information about emails, settings, etc., during an upgrade, the “Backup & Restore” option should be used.
Clicking “Download a Backup of the Settings” will automatically create a CSV file with all the important information that needs to be backed up. The following window opens up where you can save the file to a local drive on your computer.
After the upgrade, all you need to do is use the “Restore Backup” function, where you click “Browse” to select the file in your local drive. Note that there are two buttons for “Browse”. Use the one labelled “Settings CSV from all versions” unless you happen to have a pre-4.0 version installed. You can check the last line of the CSV file for version number.
The Import / Export functions are not really part of the Backup & Restore function just described, but are used to transfer the selected contents of one WordPress site to another. If you click “Export”, WordPress will create a backup file of the selected content you need transferred, which may include posts, pages, comments, custom fields, categories, terms, tags, and navigation menus. If you need updates only for a certain email type, you don’t have to back up everything, but you can select only those settings associated with that email type. For example, if you are transferring content for the WooCommerce Bookings plugin, you should select Bookings, Bookings Resources, Events, and Venues. An XML file will be created, which is in WordPress eXtended RSS or WXR format. Once you’ve saved this file by clicking “Download Export File”, you can use the “Import” function in another WordPress installation to import the content from this site.
API
Starting in version 4.0, a Followup Email API was introduced. You can enable or disable this functionality. The API allows you to create, update, and delete emails using your Followup Emails install from any third-party application. This is not limited, but we recommend you go to the Settings tab > Get Started and read up on the API first here: Follow-ups API.
Starting in version 4.0, a Followup Email API was introduced. You can enable or disable this functionality. The API allows you to create, update, and delete emails using your Followup Emails install from any third-party application. This is not limited, but we recommend you go to the Settings tab > Get Started and read up on the API first here: Follow-ups API.
Manual Emails Sending Schedule: Some email providers have set limits on the volume of email of emails that can be sent within a time interval. We want to ensure that you are not flagged as spam by sending hundreds, if not thousands, of emails all at once. Here we can define how many emails to send in a batch, and at what interval. For example, we can send 100 emails every 10 minutes until all emails in the campaign are sent. Note that this setting only applies for manual emails.
Most email providers, including Gmail, also limit the number of emails you can send in a day to limit spam. Read here for more information. If you think you might be sending more emails than the daily limit, we recommend switching over to a third party Email Provider. We have solved this problem simply by allowing you to integrate the wpMandrill plugin into Follow-Ups. Simply create an account with Mandrill and follow the set-up procedure, and you won’t have any worries about email sending limits.
Action Scheduler Logging: Follow-Ups uses a scheduling system called “Action Scheduler”. This system ensures that all emails and other scheduled actions are triggered in a timely manner. This has been proven to be a very accurate and reliable way to schedule events, and is also used by WooCommerce Subscriptions plugin. Please read more by clicking – Action Scheduler Readme. The functionality of the Action Scheduler is very similar to that of the WordPress WP-Cron API.
The Action Scheduler, by default, logs all actions to the comments table for debugging purposes. If many actions are being processed, this could cause your comment count to grow exponentially. It might seem that there are large amounts of spam coming in. Although many have inquired, this is not a bug. An action is logged in the comments table whenever it is created, started, completed, or fails.
If you’d rather not have any Action Scheduler logging included with your comments, we provide you with the option to disable email logging and/or delete all existing logs in the comments section.
Note that Action Scheduler logging is disabled by default, and you will have to uncheck the box for it to enable the logging.
Any changes you make to the settings on the “General Settings” page will be effective as soon as you click “Save Settings”.
Permissions and Styling
Permissions: This is where you can set the permissions or access privileges for using Follow-Ups. One or more of the various user roles can be selected here: Administrator, Follow-up Emails Manager, Editor, Author, Contributor, Subscriber, Customer, Shop Manager, and Teacher.
If any new selections are made on the “Permissions and Styling” page, just click “Save Settings” at the end to save them.
Emails Settings
This tab opens a page where you can manage various types of notifications:
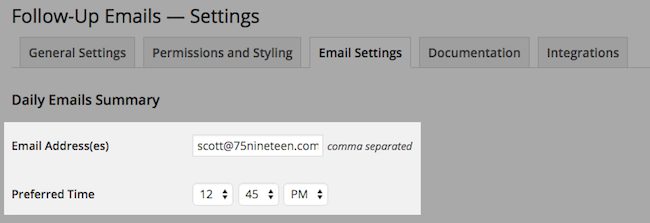
Daily Emails Summary: An email summary is created daily by Follow-Ups, where a report is automatically generated that describes all the email activity that took place during the day. A text-box is provided for comma separated email addresses that this daily report will be sent to. The preferred time of day can also be chosen for sending these reports.
Email Settings: Under this setting, you can type in a BCC email address where a copy of each email will be sent as it is being sent to a customer. You can also enter in a “From/Reply-To” email address, which is contained in a link that is sent along with your email that the user can reply to. This is the sending source of the sent email.
Note that any email addresses entered here will apply to all emails sent by Follow-Ups. If you remember, there were also “BCC” and “From/Reply-To” email address settings found earlier in the summary page for a particular email type, and also when creating/editing an email. These are more restricted in that they apply only to the selected email type or the current email being created/edited.
Subscribers Settings
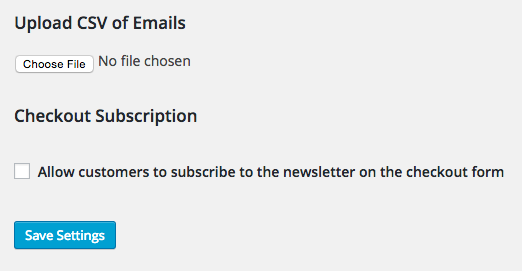
Manage your subscribers section quickly from this view. You can upload a CSV of email addresses. Just include a single column (if using Excel or Google Docs) of the list of emails in this document.
You can also turn on/off the ability to allow your customers to subscribe to a newsletter on the checkout form. If this setting is checked and on, you will see the signup checkbox on the checkout page.
Integrations
Sensei Settings (only available if Sensei is installed): There are two Sensei emails that can be sent to admins or specific users depending upon the status of learners’ progress.
Send email to the course creator when all learners have taken and passed the course – If this is enabled, then the course creator will receive the defined email when all learners have completed the course. The following variables are available to use in the email subject and body:
Send email to the course creator when all learners have taken and passed the course – If this is enabled, then the course creator will receive the defined email when all learners have completed the course. The following variables are available to use in the email subject and body:
- {course} – The name of the course completed
- {learners} – The name of the learners that have completed the course
Send an email to the course creator when there are learners who haven’t completed a course in “N” amount of time – If this email is enabled, then the course creator can schedule emails to notify them if the learners that have signed up have not completed a course in an expected period of time. These can be set for days, weeks, months, or years. The available variables are:
- {course} – The course name
- {learner_name} – The learner’s name
- {learner_email} – The learner’s email address
- {start_date} – The date the learner started the course
Remove WooCommerce Email Styles: A check-box is provided here for disabling the wrapping of all your emails with the default WooCommerce email style. This allows you to create your own customized styling for your emails.
Notify me for Failed Subscription Payments (only available if WooCommerce Subscriptions is installed): This setting gives you an option for sending a notification email about any subscription payments that failed. A text-box is provided where you can enter the comma-separated email addresses of recipients. Checking the “Send Notification Email” check-box enables this option.
nbsp;
DKIM & SPF
Please see this document on setting up SPF and DKIM.
Coupons
Follow-Up Emails -> Coupons will bring up a page listing all the coupons that have been created and are available for use. The list will show the basic details for each coupon, including Coupon Type (Cart Discount, Product Discount, etc.) and Coupon Amount (amount of the discount in dollars or percentage). This report will also tell you how many times each individual coupon has been sent.
If the cursor is hovered over any of the coupon names, you’ll have an opportunity to either edit the coupon’s parameters, or delete it. Editing a coupon is basically done on the same page used for creating it, so we’ll explain the procedure for creating (adding) a coupon first:
Follow-Up Emails -> Coupons -> Add Coupon will open up a page as shown below where you can create a new coupon. Note that all the check-boxes and text fields are blank at this point since nothing has been added yet.
The name entered in for the coupon will be for internal use only, and is the clickable name listed on the coupon list. The next option for “Coupon Prefix” will allow you to personalize the coupon for your users by adding their first name or last name to the automatically generated code – or you can create your own personalization. Any one of the standard Variables can be entered here that will automatically adjust for each coupon. The type for the coupon is selected next, where you can choose one of the following:
Cart Discount
Cart % Discount
Product Discount
Product % Discount
Sign Up Fee Discount
Sign Up Fee % Discount
Recurring Discount
Recurring % Discount
Cart % Discount
Product Discount
Product % Discount
Sign Up Fee Discount
Sign Up Fee % Discount
Recurring Discount
Recurring % Discount
The number entered in for “Coupon Amount” will either be a discount amount in dollars or a percentage discount, depending on the coupon type. The remaining check-boxes and text fields should be filled in as needed, depending on how you want your coupon handled, and provides additional conditions or restrictions on its use. After all the required fields are filled & selected according to your specifications, just click “Create Coupon” at the bottom to save the coupon. It is then ready to use in your emails!
You’ll probably notice that the coupon interface here is similar to what you are used to with WooCommerce’s built-in coupon utility. But, we’ve added some great features to the basic options, and will be adding more in the future to keep up with WooCommerce development. The new coupon code generation feature used here allows coupons to be created that are are unique for each user. Each code is also tracked after being created and sent to the user, allowing you to monitor the usage of each coupon in Reports -> Coupons.
To use a coupon in any email type, you must first create the coupon, then enable and select it in the email, and finally input the
{coupon_code} variable into the email body where you want the coupon to be generated.Manual Emails
Reporting
After opening Follow-Up Emails -> Reports, you can view the current progress of each email campaign or distinct email that has been created, as they are being tracked. You won’t have to leave your WooCommerce admin to get some insight on the effectiveness of your email campaigns and coupons. Track how each campaign performs, and what your customers are interested in by seeing what they have clicked. You can also find out exactly what has been sent and what is scheduled for each and every email and customer.
The overview on the top of the screen will show you a grand total of how many times your emails have been sent, the number of times your emails have been opened, the number of times links were clicked by recipients of these emails, and how many have unsubscribed.
Below this is a graphical representation that will provide you with a statistical overview of your most active email campaigns in several categories. To get an idea of how your emails are being handled by your clients, we show you separate bar charts for Top Emails by Opens, Top Emails by Clicks, and Top Emails by CTOR (clicks-to-open rate), depending on the tab selected. Starting from the left, there is a set of three vertical bars for each of the top five emails in decreasing order for the selected statistic. For Top Emails by Opens and Top Emails by Clicks, each set of bars will contain three color-coded bars for the number sent, number opened, and number clicked. For Top Emails by CTOR, there will be two sets of color-coded bars for the number opened, and number clicked, plus a line chart for CTOR percentage.
Emails, Users, Opt-Outs & Coupons
Just below the bar chart, you’ll see a set of tabs for Emails, Users, Opt-Outs & Coupons. The information shown for each of these tabs is described here:
Follow-Up Emails -> Reports -> Emails will show you a basic statistical summary for each of the individual emails that have been created. The name of the email and how it is triggered is listed in the left column. Alongside of this, you’ll see columns for the number sent, the number opened, and the number of times links have been clicked in the specific email. This table provides the same information as the graphical chart above, except that it covers all emails. This report will give you an idea of how well one email campaign will perform relative to another.
Each email in this list gives you a “View Report” option, that will bring you to a page that will list all of the individual emails that have been sent, and the customers that this specific email has been sent to. For each item in this list, you’ll see the details for name of customer, customer’s email, products purchased, how the email was triggered, and date sent. This report will provide insight on how well a particular email will perform.
You can also click the “View Order” link for any customer to get all the details of the specific order on WooCommerce.
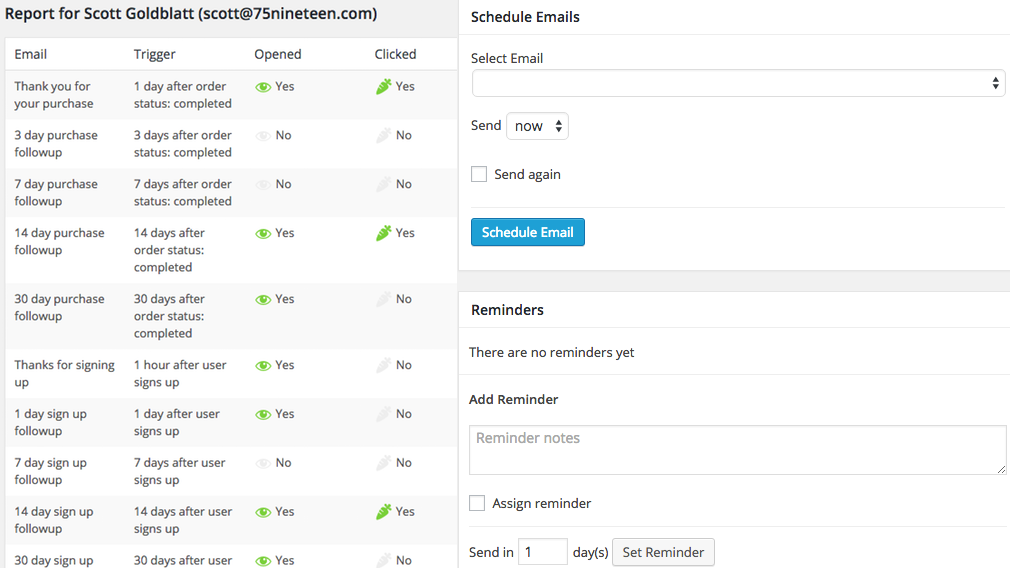
Follow-Up Emails -> Reports -> Users will provide you with a summary for each of the individual customers or users that have received an email from Follow-up Emails. For each user/customer listed, you’ll see the statistics for total number sent, number opened, and the number of times links have been clicked. You can easily find out which customers are most actively involved with your store by viewing this report.
This report also provides you with the “View Report” option, where you can view the details of all the emails that have been sent (or will be sent) to a particular user/customer. The report gives you details about all of these emails, including the name of the email, how it was triggered, and date sent (or will be sent). The email address of the user/customer is also provided, along with the products purchased. Clicking the customer name will bring up a page showing all the details of all the orders made by the customer on WooCommerce.
Note 1: Anytime you click the order number (or the “View Order” link), you’ll get a page showing the details for that specific order on WooCommerce. If you look in the “Order Notes” section in the right column, you’ll see notes for any emails that have been queued up specifically for that order to send at some future date. These notes are continually updated automatically by Follow-Ups for any new email activity for that order. This is convenient for monitoring the progress of a particular order.
Note 2: If you decide that you don’t want to send a particular email to a certain customer, there is a way to handle this. See the section on “Filtering” in the “Scheduled Emails Report” page.
Note 3: Anytime you open one of the four tabs under Follow-Up Emails -> Reports (Emails, Users, Opt-Outs, or Coupons), the list that is brought up is based on the most recent email sent starting at the top. All items in the list are then ordered from top to bottom according to the next recent date sent for the associated email. Also, when clicking “View Report” for users or emails, every item in the report will be listed the same way.
Follow-Up Emails -> Reports -> Opt-Outs will bring up a report that is (hopefully) much smaller than the other reports, and will provide you with the email addresses of all customers/users that have opted out of receiving emails from Follow-up Emails. Alongside each email address, you’ll see the date the user opted out. The screen will be something like the image below. See the “Opt-Out” section below for details on how set up the opt-out feature for customers/users.
Follow-Up Emails -> Reports -> Coupons will give a summary all coupons that have been sent by Follow-up Emails, and to whom. For each email that was sent with a coupon, this report will tell you the name of the coupon, the coupon code generated for it, the name of the email, the email of the recipient, and date sent. You can also check to see if the coupon was actually used or not, and if it was, the date and time of use is shown. This will give you a better understanding on how well certain coupons are working at creating new business transactions.
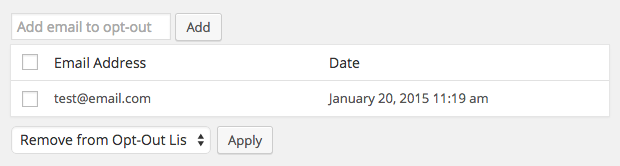
Opt-outs
Follow-Up Emails -> Opt-outs will open a page where you are able to view the email addresses of all users that opted out of receiving future emails, and the date on which they opted out. The email address of a user who opted out can be manually added to the opt-out list, or via the unsubscribe shortcode in your email as noted below. You can find out who opted out by checking Follow-Up Emails -> Reports -> Opt-Outs, as explained above. This report is updated automatically whenever a user/customer decides to opt-out. You can also select one or more emails to remove from the opt-out list. This is done by checking the appropriate emails, and then applying the “Remove from Opt-Out List” option in the drop-down menu.
Users can also opt out at any time by clicking a link on the sent email, or by going directly to the user account screen or any other page within your store website. An additional checkbox can be provided on the page by inserting the shortcode: [fue_followup_subscriptions]
Note: For backwards compatibility [woocommerce_followup_optout] will still work for you. It will simply render the same output as the new (and recommended) [fue_followup_subscriptions]
The main difference between the shortcode and the opt-out link in the emails are that these two shortcodes allow users to remove/unsubscribe themselves from emails that are already scheduled in the queue, while the opt-out in the email adds their email to the the opt-out list which will stop Followup Emails emails from being sent to that email in the future.
If a user opts out either via the unsubscribe link in the email or using the shortcode, they will be listed automatically in the table on the Opt-Outs page in your Follow-Up Emails admin.
A link to this page can then be sent with your emails. Opting out capability is mainly intended for users that haven’t made a purchase. Because of these generic types of emails that are not transactional in nature – it might be best to allow your users to opt-out of these emails.
Update: In version 4.0, Follow-Up Emails switched to using endpoints for the unsubscribe functions. The {unsubscribe_url} variable will always point your their /unsubscribe endpoint (like http://www.domain.com/unsubscribe). The email subscriptions page is also auto-generated, but because it uses endpoints now, it doesn’t show up in the settings page as it did in pre-4.0 versions. The endpoint for the email subscriptions page is “my-account/email-subscriptions” (http://www.domain.com/my-account/email-subscriptions/). See FAQ for typical issues enocuntered.
Detailed Schedule
Follow-Up Emails -> Scheduled Emails will bring up a page that will give you an overview of all the emails that are currently in the queue. As soon as an email matches the criteria set for it, it is automatically placed in the queue. Some of the tests used to match an email to its criteria include event triggered on, priority test, product/category enabling, once per customer, etc.
Once an email is in the queue, it will remain there until the interval timing set for the triggered event elapses (or until it is deleted). The email is sent as soon as the interval elapses, and removed from the queue. There may be times when an email already in the queue will satisfy the criteria again for the same customer. If the “Adjust send date” option is checked (see Email Details -> Settings above), the scheduled send date of the email already in the queue is adjusted to a date further in the future, and the second email is not added to the queue. The second email is added if “Adjust send date” is not checked.
The summary page will list all of the emails in the queue, with the next one to send at the top, and the rest listed in their order to be sent. As shown below, the summary includes the recipients email address, order number, name of the queued email, status, and scheduled date to be sent. The recipients email address, order number, and queued email are links that can be clicked to view more details on the chosen item.
The status is normally “Queued”, and you’ll notice three clickable options below each “Queued” indication – Suspend, Send Now, and Delete. If an email is suspended, it will show a status of “Suspended” until it is either activated again or deleted. If the timing interval elapses while an email is suspended, it will remain in the queue until it is deleted. If an email is sent now, the scheduled time will be bypassed and it will be sent immediately. After sending, it is removed from the queue. Deleting an email will remove it from the queue without sending it.
The email status can also be changed by selecting an item in the Bulk Actions menu, and then applying it. The options are: Activate, Suspend & Delete, as shown below. The selected action will apply to all emails that are checked in the left column. Changing the status for multiple emails at once often saves time.
The scheduled emails can be also ‘Filtered’ according to the customer name. By default, it shows all customers that will be receiving an email in the near future. If you filter this list for a certain customer, the screen will show all the queued (or suspended) emails for that particular customer. So if you decide you don’t want a specific email be sent to a specific user, you can just click or “Delete” (or “Suspend”) for that email.
Twitter and Follow Up Tweets
Bounce Handling and Setup
In the world of emails anytime an email can’t be delivered it is called bounced. If it does bounce it can be then considered as either a hard or soft bounce. See MailChimps great explanation of a soft vs hard bounce.
Essentially a hard bounce indicates a permanent reason an email can’t be delivered to that address, where a soft bounce usually is only a temporary issue. Luckily Follow Ups has a section of settings related to handling bounced emails.
Under Follow-Up Emails > Settings > General Settings you’ll find a Bounce Settings section.

To begin you can enter an email address where you want bounced email notifications to be sent. Beneath that if you check and enabled Automatic bounce handling you’ll have some new fields appear.
First, it asks you to enter the POP3 details of the address you’ve entered in the Bounce Address field. This all depends on the provider that you use, whether that be Gmail, Outlook, Yahoo, or even a company provided address, you can find usually find your POP3 details accordingly and enter them here.
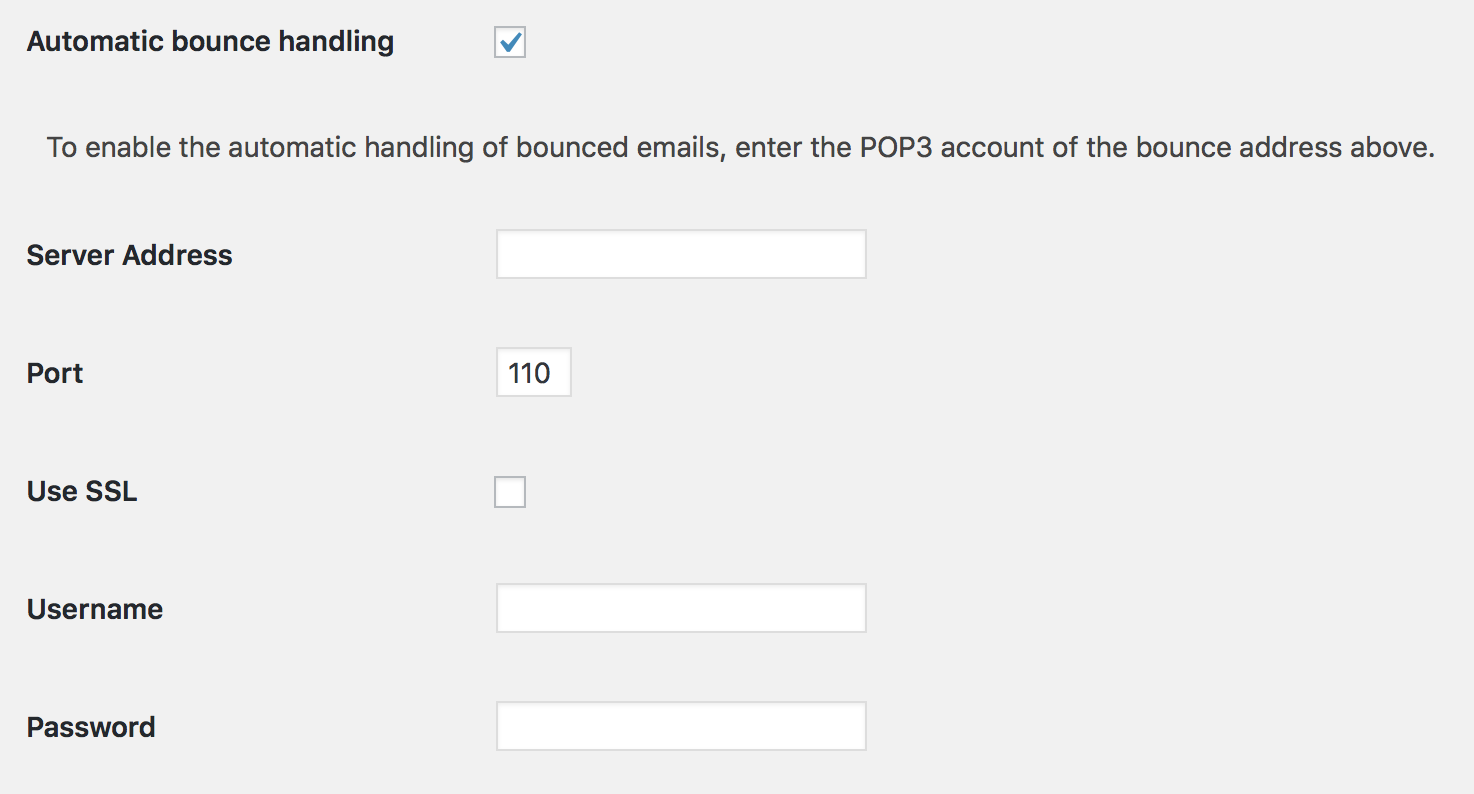
Once that is configured you can enable or disable Delete Messages, and set how many times Follow-Ups should attempt resending any soft bounces. This includes an interval set in minutes between tries. After it exhausts the tries it’ll mark it as a Hard Bounce.
Tutorials
Still stuck on where to start? We hear you. We have started to create a comprehensive set of tutorials for typical store scenarios, so you can get started faster and drive more revenue as quickly as possible. See all tutorials.
Frequently Asked Questions (FAQ)
Uninstall
Please note: This extension deletes all of its information from the database if you delete the plugin from WordPress Admin. Before doing so, we recommend you use the backup feature. This is found in Follow-Up Emails -> Settings -> System Performance. See the “Backup & Restore” section on the “Settings” page for instructions.
posted by Unknown @ 07:00
0 Comments
![]()
